How to Migrate from WordPress to Jekyll Running on Github
This one’s for you Rob!

Introduction
Why are you migrating?
Wordpress was working great for me and I didn’t have any major issues with it, so why did I switch? Here are some reasons you might want to power your blog with Jekyll:
- Security - I’ll never have to worry about vulnerabilities in WordPress or PHP again.
- Performance - Static files are fast.
- Portability - If I ever need to migrate to another host, I can install Jekyll on the new host or simply push the output from a local Jekyll install.
- Cost - GitHub Pages is free so I can now cancel my shared hosting account.
- Just for the hell of it.
If those reasons sound good to you, ask yourself…
Should I migrate? (limitation and considerations)
Before you start executing my step-by-step super-detailed directions, let’s take a moment to examine some caveats with Jekyll and GitHub Pages:
- You can’t have dynamic content - Github runs Jekyll for you, and only generates static content. That means you can’t use any server-side languages or frameworks to generate or handle dynamic content.
- No Jekyll plugins - Github runs Jekyll in safe mode which disables the use of custom plugins.
- You will (most likely) have to migrate your site structure as is - Again, you will have no server-side capabilities so changing up your site structure can be a major pain (Refer to the Cleanup section for more info).
- Stuff can go wrong - If it aint broke, don’t fix it, right? As with any migration or new project, there is always something that you didn’t account for or something that didn’t go as planned. This is true of any project.
If you’re OK with the caveats, let’s get setup.
Setup
Make sure you have a Github account.
Just go to Github’s signup page and create an account. It’s free for unlimited public (open source) repositories.
Create your Github Pages repo.
Follow the Github Pages setup instructions.
Export your WordPress content
From the WordPress admin backend, go to Tools > Export and export all of your content to an XML file.
Get Python 2.7.X (Don’t get Python 3.X!)
We’re going to need Python to run the conversion script. There are major breaking changes between Python 2.X and Python 3.X. Make sure you get 2.7.X for the purpose of the conversion.
Install pip, the Python Package Installer
pip well install all the dependencies we need for the Python script.
(original instuctions from this Stackoverflow question)
- Download the last easy installer for Windows: (download the .exe at the bottom of http://pypi.python.org/pypi/setuptools ).
- Install the easy installer.
- Get the pip installer source from the pip page.
- Uncompress pip.
-
Go to the uncompressed pip directory and run:
python setup.py install
Get Exitwp
Exitwp is the Python script that will convert the WordPress XML file to the Jekyll markdown structure.
- Go to the Exitwp Github page and download the source (or clone the repo locally).
- Extract the files from the zip you downloaded. I put mine in
C:\Projects\jbubriski\Wordpress to Jekyll Migration\thomasf-exitwp-ede1dd5
Use pip to install the Exitwp dependencies
Exitwp needs PyYAML for Reading configuration files and writing YAML headers and Beautiful soup for Parsing and downloading of post images/attachments. It also requires html2text, but that is included with Exitwp. To install the 2 missing dependencies:
(If you have a slightly different version of Python, make sure to change the version number, or if you have Python in your path, you don’t need the full path. If you have multiple version of Python installed, male sure you use the right one.)
- Navigate to the directory where you extracted Exitwp
- Run
C:\Python27\Scripts\pip.exe install --upgrade -r pip_requirements.txt
You should see some output like this:
Downloading/unpacking BeautifulSoup (from -r pip_requirements.txt (line 1))
Downloading BeautifulSoup-3.2.1.tar.gz
Running setup.py egg_info for package BeautifulSoup

Requirement already up-to-date: PyYAML in c:\python27\lib\site-packages (from -r pip_requirements.txt (line 2))
Downloading/unpacking html2text (from -r pip_requirements.txt (line 3))
Downloading html2text-3.200.3.tar.gz
Running setup.py egg_info for package html2text

Installing collected packages: BeautifulSoup, html2text
Running setup.py install for BeautifulSoup

Running setup.py install for html2text

Installing html2text-script.py script to C:\Python27\Scripts
Installing html2text.exe script to C:\Python27\Scripts
Installing html2text.exe.manifest script to C:\Python27\Scripts
Successfully installed BeautifulSoup html2text
Cleaning up...
Now we should be ready to start the conversion.
The Conversion
Run Exitwp with this command (again, check your Python version):
C:\Python27\python.exe .\exitwp.py
which should produce a structure like this one inside the Exitwp directory:
- build
- jekyll
- [yoursitename]
- _posts
- about
- achievements
- contact-me
- kentico-resources
- resources
- [yoursitename]
- jekyll
Setup comments with Disqus
Since Jekyll generates static HTML it wouldn’t make sense for our comments to be imported by Exitwp. To provide comment support we either have to rely on a 3rd party service or a server-side language. Since we’re running Jekyll on GitHub Pages the server-side option is out, so we need a 3rd party service.
There are a few services out there that can provide a free commenting system. Disqus, Livefyre, IntenseDebate, and even Facebook all provide HTML snippets that you can drop into a page or template to automatically provide comments. I happened to choose Disqus since I’ve seen it on a lot of other tech blogs and it’s free. Here is how you set it up:
- Signup for Disqus.
- Install the Disqus plugin for your WordPress site.
- Setup the Disqus plugin (go to the Wordpress Admin Comments section and follow the wizard).
- Export comments to Disqus.
They say it can take up to 24 hours for the import to complete, but don’t wait up. We can still configure Disqus to work with our Jekyll blog even though the comments aren’t live yet. If you’re going to create your own templates, simply grab the Disqus HTML snippet and drop it into the templates. If you’re going to use a blogging framework like Jekyll Bootstrap, wait until we get to the configuration section where it will take 2 seconds to configure.
Jekyll Bootstrap
While Exitwp does a lot for you, it leaves out the supporting structure to actually run your blog. Generating atom feeds, category and tag pages, and other supporting functionality are left up to you. This is where a Jekyll Bootstrap comes in.
Jekyll Bootstrap (JB) is
“a lean blogging framework made for developers and designers.”
It has the layouts and templates needed to create a standard blog website while providing numerous configuration options for the most common features you might change:
- Comments provider
- Analytics
- Social networking/sharing
- Other core setup options
To get started clone Jekyll Bootstrap on GitHub or download a zip of the latest code and unzip the files.
From there, you should be able to copy the entire contents of the Jekyll site structure directly on top of your current website that was created by Exitwp. While some of the folders will have the same name, it should be safe to overwrite everything in the directory with the JB files.
The individual files are too numerous to list here, so I’m just going to provide the necessary changes we need to get our blog up and running with as much functionality as is provided out of the box.
Open up the new _config.yml file in the root of the site that was provided by JB. The config file uses the YML format which is extremely user friendly. For our specific use of JB with GitHub Pages, we should set a few config options right off the bat. Put these settings at the top of your config file:
safe: true
auto: true
server: true
markdown: rdiscount
Jekyll runs in safe mode on GitHub Pages, which disables the use of plugins. The auto setting automatically rebuilds the site when changes are detected. server starts the Jekyll server when run from the command line. markdown allows us to set rdiscount as the markdown parser.
(GitHub also uses lsi: false and pygments: true, but JB should already have those settings defined.)
Other than that, you should go to through the rest of the configuration options and set the important ones:
- permalink - I set mine to
/:year/:month/:day/:title/to match my WordPress permalinks. - production_url (username.github.com)
- comments (this is where you set your Disqus short name)
- analytics (Google tracking ID)
Testing
Before we deploy the new site to Github, we should make sure it works locally first! Github had some issues running Jekyll on my content, and there were no helpful error codes or messages. To make sure things go as smoothly as possible, we need to run Jekyll locally.
Install Ruby
I installed Ruby 1.9.3 and the Ruby Dev Kit from RubyInstaller.org. For the Dev Kit, follow the install instructions on the Ruby Dev Kit Wiki.
Install Jekyll
At the time of writing GitHub pages runs on Jekyll 0.11.0, so we should use too. Double check that the version hasn’t changed on the GitHub Pages documentation page. To install our specific version, run:
gem install Jekyll -v 0.11.0
Once installed navigate to the directory of your site and run this command:
jekyll --server
If everything went smoothly, Jekyll should be listening on port 4000 by default. Check it out!
If the site isn’t running, check the output from the jekyll command to see if it reported any errors. If you get some random errors from Maruku, make sure you set your markdown parser to rdiscount. I found that rdiscount is more durable and gives better error messages. You can set that in the _config.yml, or test it manually:
jekyll --server --rdiscount
If you haven’t used rdiscount yet, you might get this error message:
You are missing a library required for Markdown. Please run:
  $ [sudo] gem install rdiscount

ERROR: YOUR SITE COULD NOT BE BUILT:
\-\-\-\-\-\-\-\-\-\-\-\-\-\-\-\-\-\-\-\-\-\-\-\-\-\-\-\-\-\-\-\-\-\-\-\-
Missing dependency: rdiscount
In which case you just install rdiscount:
gem install rdiscount
Now if you have minor syntax errors you can fix them manually, but for a full blog conversion the issues may be more prevalent. Let’s do some major cleanup…
Cleanup
While Exitwp is an awesome tool that saves us a lot of time, it couldn’t handle certain things like WordPress Image Caption tags and certain markup syntax.
For the WordPress Image Captions, I ran a simple regex that extracted the caption text into a span tag.
\[caption.*?caption="(.*?)"\]
<span class="caption">$1</span>
This isn’t perfect, and I actually went back and manually cleaned these tags up. I ended up taking the caption text and adding it to to title tag of the image, removing it from the visible portion of the page.
For syntax parsing issues, look for markdown or liquid syntax characters, and replace them with HTML entity codes.
(you probably wont have that last one unless you work with Kentico macros and blogged about it)
Markdown parsers should leave HTML content in place, so hopefully you don’t have anymore major issues. If you do, feel free to drop a comment about something others might encounter.
Preserving existing category and tag links
Jekyll handles certain things differently than Wordpress. Mainly, your permalinks and category and tag pages may be different. For me, WordPress was creating a dynamic page for each category and tag. Jekyll however, creates a single page for each type:

Ideally we should setup 301 redirects for these pages, but one thing is for sure: pages are going to be missing. Until Google re-indexes your site, users may click search result links to the category and tag pages and get 404’s.
If you’re running your blog off something other than GitHub pages, you can utilize something like an .htaccess file to setup redirects, but for GitHub Pages we can’t do that. Your options are to accept defeat and take the hit to your SEO rank, or manually setup redirects. For the redirect route, read on…
Below is some HTML you can use to redirect an old URL to a new one.
<!DOCTYPE html PUBLIC "-//W3C//DTD XHTML 1.0 Transitional//EN" "http://www.w3.org/TR/xhtml1/DTD/xhtml1-transitional.dtd">

<html xmlns="http://www.w3.org/1999/xhtml" xml:lang="en" lang="en">
    <head>
        <meta http-equiv=refresh content="0; url=/tags.html#IIS7-ref" />
        <meta http-equiv="content-type" content="text/html;charset=UTF-8" />
        <title>Redirecting to new location...</title>

        <script type="text/javascript"> function delayer() {window.location = "/tags.html#IIS7-ref"} </script>
    </head>

    <body onLoad="setTimeout('delayer()', 1000)">
        <h1>Redirecting to new location...</h1>
    </body>
</html>
The specific version above will redirect a page to
/tags.html#IIS7-ref`
So all you need to do is place this HTML in a file at the location:
/tags/IIS7/index.html
This isn’t perfect, but it’s better than nothing! I found some posts saying that meta refreshes with a 0 timer are now treated as 301 redirects, mainly for people with no access to server-side redirect functionality. I’m not sure if that is true, but at least your users wont see 404 pages. I also included a JavaScript redirection in case our visitors’ browsers don’t support the meta tag, or block it.
Mapping to a new site structure
If you’re migrating your site structure as is, I’m happy for you and you can skip this part! However, in my case I was removing part of the path to my blog. My posts went from from:
http://www.johnnycode.com/blog/2012/….
to
http://johnnycode.com/2012/…
Like we did with the tag and category pages, we need to setup redirects for each post link that we want to preserve. To avoid a lot of manual work we can use a Jekyll plugin locally to generate the redirect pages automatically. While the use of plugins on GitHub are out, there isn’t anything stopping us from using them locally!
Take a look at the redirect plugin on GitHub. If you pull that plugin down into your site, and disable safe mode, running Jekyll locally will generate the redirect pages. After doing that once, you can copy the pages from the output directory back into your main source directory! In my case, I left the plugin in the plugins directory, but it wont actually run when deployed to GitHub.
Deployment
Now that we’ve completed the conversion and cleaned up our site we can finally deploy! Simply use Git to commit and push your content to your GitHub Pages repo. Once you push, GitHub will run Jekyll on your content and copy the output to the hosting destination. If the process is successful, you should receive an email like this one:
Your page has been built. If this is the first time you’ve pushed, it may take a few minutes to appear, otherwise your changes should appear immediately.
Unfortunately, things don’t always go as planned. In the event of a failure, you will receive an email like this one:
The page build failed with the following error:
unable to run jekyll
Yep, that is the entire email! As you can see, there is no indication to what caused the failure. This is why it’s important to first test your site locally and use the correct settings. If you get a failure notice, do a search through your content for markup issues, or start removing posts 1 by 1 until you find the culprit(s). This is how I discovered the leftover caption tags and other weird markup issues.
Double check EVERYTHING
While I’m happy with the end result, and I felt good migrating off Wordpress, I lost about 75% of my blog traffic in the process, due to my own stupidity. Before you flip your DNS (int the next section), make sure all your old links still work!. Mainly, make sure your home page, post pages, category/tag pages, and your RSS/Atom feeds work! Even after a month or two I didn’t realize that my feed (via feedburner) was completely broken!
FYI, this is what happens when you F up DNS and/or your RSS/Atom feed:
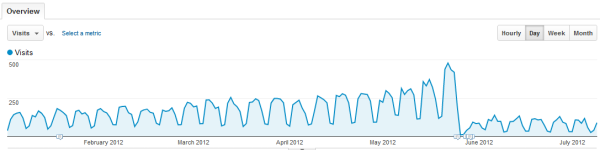
See! SEE!?!??!
Flip the DNS (Setup your CName.)
Once you verify that your site was successfull deployed, let’s setup our own custom domain. If you don’t have an existing domain, I would recommend NameCheap (discalimer: my affiliate link).
Setting up GitHub Pages to use your custom domain is super easy. All you need to do is push a special file into your repo, and reconfigure your DNS with you registrar.
Per the GitHub pages doucmentation on custom domains, just create a file called “CNAME” in the root of your site, and add your domain name to it. Mine looked like this:
johnnycode.com
Once that is done, push it up to GitHub.
Now go to your domain registrar and find the pages where you can edit your host records. Mine looked like this:
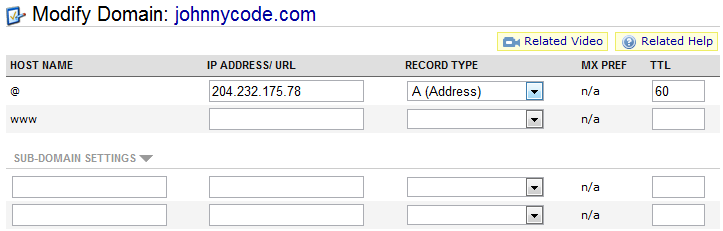
Set the IP address to be 204.232.175.78 (Github’s static IP) for the A record of a top-level domain. For subdomains (like www. or blog.) set the CNAME to be [your username].github.com.
Keep in mind that DNS can take a while to propagate. Notice that I set my TTL to 60 seconds. That will make it easy to fix issues later on if we have any. Once you’ve ironed out any DNS issues, set it to something higher like 1800.
After DNS has propagated successfully, you should go into your _config.yml file and change the production_url setting from username.github.com to your domain name.
Conclusion
The verdict?

But don’t take my word for it. You’re looking at a Jekyll powered blog running on GitHub right now! Browse around the site and check out how it works!
The result of this conversion was reasonable port. I started with a self hosted Wordpress blog and ended with a Jekyll powered blog running on GitHub pages along with Disqus for comments. While I didn’t really gain much, it was a great experience and I’m now more familiar with Jekyll and Markdown.
Would I recommend Jekyll and GitHub Pages to others? Here are my official recommendations:
Migrating Your Blog?
Use caution when converting your existing blog. Be prepared to spend some time working out the kinks.
Creating a New Blog?
Go spend 3 minutes to setup a new blog with Jekyll Bootstrap you lazy bum.